How I Make Woodcuts and Wood Engravings

TO EMPHASIZE THE FUNDAMENTAL DIFFERENCE in character between the woodcut and the wood engraving, I might say that, aside from the completely different technique, the engraving is the more cultured member of the pair. In saying this, I do not attempt to express a judgment of artistic values.
Engraving affords a wider range than cutting. It does not, however, give the stubborn, rebellious artist either the spiritual or technical means for making a lot of noise. Nor does it run around with hair on its chest and hobnailed boots on its feet; it is no table-thumping orator, loudly preaching a new world-philosophy; it does not have a rugged countenance or offensive manners. Perhaps it does not dig so deep, perhaps it handles problems of style more cautiously; it is more adaptable; does not demand attention at all costs; is less unkempt. Altogether, it is less of a roughneck than its brother, the woodcut.
If occasionally it does put on an act, it is on a smaller stage and before a smaller audience. Its repertory is suited to the Little Theatre, not to the Metropolitan Opera House.
The best wood used for engraving is boxwood. It is the hardest and finest-grained of all woods. There are several varieties, listed here in the order of preference: American, African, and Turkish boxwood, also maple. An ancestral boxwood tree-trunk is only as thick as that of a twelve-year-old birch. The rings of boxwood lie so close together that they are almost indistinguishable. In structure and consistency the wood resembles ivory.
In preparing an engraving block, the boxwood log is sliced across the grain and the slices stored for a number of years in a dry place. They are then sawed into small pieces and the best of them glued together into rectangular plates and polished down on both sides until they are exactly type high. The engraving surface is evened off with a special scraper, rubbed down with very fine emery paper, and finally thinly coated with shellac. The block thus prepared for engraving no longer resembles wood, but rather some plastic composition. The grain of the wood runs at right angles to the printing surface, not parallel to it, as in the woodcut block. The structure of the wood is of no importance in the engraving, but the cabinet maker who prepares the blocks must leave no noticeable unevenness or seams of glue. If a seam splits or the block warps, then the wood was not sufficiently dried. After engraving also, the blocks must be kept in a cool, dry place, and must stand, not lie flat.

The engraving tool is the burin, of which there are hundreds of varieties, from the most pointed to the broadest. [Illus. No. 16.] It is made of very hard steel. About a third of the hemispherical handle is cut away on the under side in order to prevent its catching when the burin is held low over the block. [Illus. No. 17]. The tool is held in the hand so that the handle rests against the outer part of the palm at the base of the little finger. The thumb, extended towards the point of the burin, rests on the block as a support and pivot. The four fingers are drawn back and curved, lying close together on the upper edge of the burin (seen from below the tips should look like peas in a pod) and pressing the tool against the ball of the thumb. The fingers must not clasp the burin; they must be kept away from the lower edge for the same reason that the handle is cut away. There should be a hollow space between the handle and the palm of the hand.
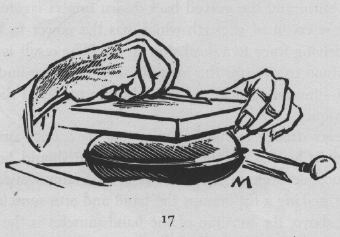
Moving the burin forward is most difficult for the beginner. It is done by the combined strength of finger and hand muscles, not by the strength of the arm. A sort of kneading motion takes place, a restrained unfolding of strength in a forward direction which can be stopped at any moment. This drives the burin through the wood in a long, uninterrupted movement, and allows it to dip more or less deeply into the wood without breaking the rhythm or getting stuck. The motion is correct when it can be performed in the air over the block as easily as in the wood itself, and without noticeable difference. The palm of the hand vaulted over the burin and the curved back-drawn fingers create an inexhaustible reservoir of strength which has the power to bring the forward-driving force to a dead stop at will. The result is that it is most unusual to overrun the intended end of a line and damage the block - unusual, at least, in one who has mastered the engraving technique.
It seems strange to the beginner that he cannot simply take the burin in his fist, for he believes that he should be able to hold it most securely in that way. It is an anatomical fact, however, that making a fist cramps the hand and arm muscles, while, as stated above, the freedom of the hand muscles is the supreme essential needed for controlling the graver.
Anyone who has learned to play the violin knows what difficulty he had at first in holding the bow. He, too, thought, in his all-knowing ignorance, that he could take hold of the bow as though it were a stick to beat with. The realization that it must be held in the fingertips alone, came only when he found that the hand must work independently of the wrist.
When the engraver has become accustomed to the independent action of hand and wrist, the extent to which the strength of his arm may come into play will be determined automatically.
The aforementioned kneading motion of the hand pushes the burin forward onto the soft ball of the thumb. At the completion of the motion, the fingers draw the burin back again, but the thumb remains forward as a guide for the tool. The left hand presses the block against the burin and, in the cutting of curves, turns it on the axis of the right thumb, which rests on the block. The turning is facilitated by the round leather sandbag on which the block rests. Beginners must be warned to place the fingers of the left hand so that, if the burin happens to slip, it will go between them. Burin cuts are not dangerous, but can be quite deep. Anyhow, every engraver must get an occasional cut; it goes with the calling.
The beginner will do well to practise with the burin on a small piece of boxwood, making simple, abstract designs. He should try to engrave fifteen or twenty lines close together without having them run into one another. This exercise should be done with burins of different sizes, and with varying distances between the lines. One should not expect to make a pretty picture right away. In fact, it makes the technical exercises easier not to think of pictures at all.
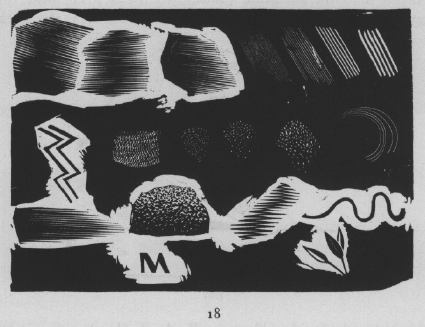
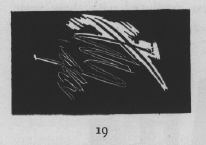
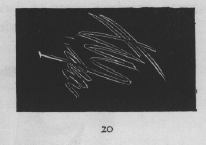
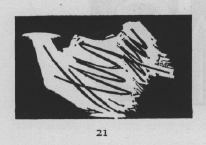
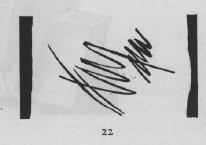
From straight lines the student advances to curves, then to circles and zigzags. Then he practises engraving a few pen-strokes which he has drawn on the block himself. First he outlines the pen lines on both sides with a fine-pointed burin; then, with graduated burins, gradually levels off the area around the lines to a depth that will not print. [Illus. Nos. 18-22]
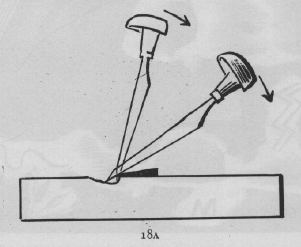
To make this easier, he uses a small flat sliver of wood, about 1/16" thick, tapered to a knife edge, like a small school ruler, to use as a fulcrum upon which to rock the burin and prevent slipping (See Illus. 18a.)
Another exercise for the beginner: Without any preliminary drawing, and using a broad graver, outline an irregular area on the darkened surface of the block. Then rout out the wood for about one-quarter of an inch around this area and, taking a graver which has a very sharp point but which widens rapidly, break up the outlined area into a series of lines which, beginning at the center and working toward the edges, will make a transition from black to white and leave the original outline no longer noticeable. As one works out from the center, the lines which are to appear white are gradually widened by the ever deeper incision of the burin, which is equivalent to narrowing the black lines to a hair's breadth. The fineness of the wood permits the most delicate black lines. The first proof will show whether or not the transition from dark to light has been made successfully; if not, the individual lines must be worked over again.
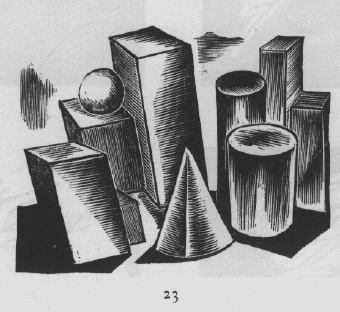
Next the beginner may attempt a small design consisting of such primary forms as cubes, cylinders and prisms [Illus. No. 23], whose values may be brought out either in a chiaroscuro effect or by a changing of tonal areas without consideration of space.
After he has made several engravings of simple objects, the student may begin on landscapes or figures. He still has little or no idea how difficult it is to produce, in engraving technique, even the smallest of his earlier pen or crayon drawings, and an experienced teacher would advise him to choose an even smaller format. From his preliminary studies he has an inkling of how slow a process it is to organize an area into black and white. He has noticed that a mistake in engraving can only rarely be corrected - that there is nothing in wood engraving equivalent to the eraser. He has found that it is impossible to give a very light, free suggestion, as with charcoal, pencil, or pen-and-ink; that a broad, impulsive sweep of darkness, produced with these same media, is the privilege of drawing, and that in it, when the composition demands, as much as one-third of the space can be filled in two seconds, but that this same effect can be achieved in engraving only after cool consideration and the tedious stringing together of hundreds of engraved lines. So it is assumed that the engraver has the whole layout of the available space so clearly in mind that at the first cut he knows exactly what is to follow, although it will take four or five hours before the work is completed.
It takes several years before the engraver's imagination is so developed that he can take full advantage of all the possible variations, such as the relationship of the line groups to one another, the breaking up of the surface into dots or longer or shorter wedge shaped strokes - the rocking of the burin vertically or horizontally.
In hacking and sawing up the surface of the block, and in effecting the crisscrossing of those white, so-called negative, effects which are the essence of the black-and-white style of the engraving, it is uncannily easy to reach a point where the surface of the block breaks down of itself, with resulting technical and pictorial emptiness. Where too much white has been introduced, black is necessarily lacking and can never be replaced. In etching there is always the possibility of repairing accidental injuries to the plate by rubbing down or hammering out from behind.
The style of the engraving, insofar as it can be put into words at all, depends on the merging of the black (positive) effects into the white (negative), and of the white effects into the black.
The wood engraving begins where the woodcut, by its very nature, must leave off - with tonal gradations.
If the woodcut, because of its material and tools, offers all the prerequisites for a style of black-and-white areas and bold contours, so the wood engraving is in its element when it employs the countless variety of effects afforded by the hard wood of the box and the rich choice of implements.
The engraving should accomplish just those things which the woodcut, because of its style, must leave undone, and vice versa. The wood used in engraving can produce the finest tonal variations, composed of innumerable little lines which the naked eye distinguishes separately only when attention is drawn to them. I have often heard the astonished exclamation: "Why, that looks like a copper or steel engraving!" And, indeed, the wood engravings of the bygone craftsmen, which were the daily fare of the illustrated papers from 1840-1890, are often much finer than copper or steel engravings.
It is quite comprehensible that some, if not many, modern artists have yielded to the matchless charm of this engraving technique, for the field has been left entirely to them. Considered as an original graphic medium, wood engraving is still quite isolated, being either completely unknown to the layman or confused by him with other techniques. Its prints are not yet given their full due of appreciation among the related arts: etching, lithography, woodcuts and copper engravings. But all of this does not keep the resolute artist from devoting all his strength and love to the craft.
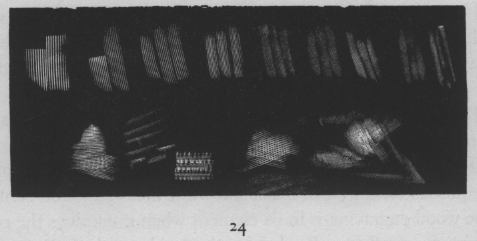
The technique of tonal engraving has on its program one more item for epicures, the engraving made with the so-called multiple liner. [Illus. No. 24.] This tool has the same form and function as an ordinary one-track burin, but instead of one point it has ten or twelve at the same level, and it places at the disposal of the engraver a wealth of gradations to satisfy the most demanding. But as with all such refinements - star-performances, overbreeding the margin is very narrow; it is easy to fall into very poor stuff indeed. Technical bravura alone is nothing - it gives only a slight superficial titillation. A second glance reveals the underlying emptiness. And it is the responsibility of each artist to decide just how far to go.
But apart from this danger, the use of this consciously prepared tool gives a new form of expression to the graphic arts: a wood cut rooted entirely in a technical tradition, free from any echo of the other forms so richly at the disposal of the creative artist.
With the use of this multiple liner, engraving becomes almost superfluous. It is more like painting with a metal brush a few tenths of a millimeter into the hard polished surface of the boxwood block. The greater the pressure (that is, the deeper this sharp 'brush-graver' goes into the wood), the lighter the line will appear in the print. During the work, the eye is concentrated on the direction of the tool, not on the trail it leaves behind it, which can only be seen in detail through a magnifying glass. The hand must feel its way, allowing the graver to cut more, or less into the wood; and only that hand dare attempt it which, through long experience with wood, can depend on its own accuracy.
It is not necessary to use a magnifying glass; for the time being it is enough for the eye to take in the total impression of the marks left by the multiple liner. The organization of the area into groups of varying tonal values has been determined by the choice of the graver. But the darkening of the surface is still a prerequisite. Without it, not only would there be a great strain on the eyes, but it would be impossible to see where the wood had been engraved and where not. The effect would be the same as if someone were to write with white chalk on a white wall.
Every style-conscious artist will soon discover that only with the greatest caution can the multiple liner be used in combination with ordinary burins in one and the same engraving. Its accurate parallels seem painfully stiff and lifeless in contrast to the more flexible lines drawn with the one-track graver.
A mixture of these two techniques will generally cause some feeling of displeasure to the initiated observer. But there are a few cases where the multiple-line technique can be deliberately introduced into, and harmonized with, the single-track technique; namely, when the beginning and end of each line in the multiple liner group is taken up and continued, line for line, with the burin, and led from its mechanical sterility back to the easy flexibility of the other lines. Of course, the skillful and sensitive artist can override all such warnings and still be justified in the light of his particular artistic purpose (e.g., Lynd Ward). There is no greater delight and satisfaction to be found than in successfully overthrowing established doctrines and producing something on one's own account.
Used alone, and with rich technical imagination, the multiple liner, with all the subtlety of its gradations, can produce such an enchantment of tone-painting that the dangers of the technique become negligible, and he who sees a print made in this manner can no longer tell how it was made.
It was invented by a commercial woodcutter and used for a generation in a strictly subordinate role. It attained an independent position when the whole technique of wood engraving was taken over by the original reproductive processes. In the last twenty years it has particularly proved itself. It is found most often in French book illustration. The field of its usefulness has been even more enlarged with the latest development, the colored wood engraving, which, again, must not be confused with the colored woodcut.