Colour Woodcuts
PRINTING MATERIALS
Brushes - Baren - Re-covering baren - Colours - Preparation of Ink - Paste - Mixing Colours - Paper - Sizing - Cutting the Paper - Damping
BRUSHES
THE type of brush
required for printing will be seen by reference to Fig. 9, showing
side view, front view, and plan. The brushes are made of a good mass
of stiff, springy hair and 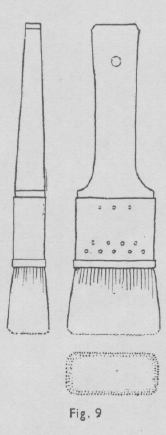 are flat underneath. Their bulk
constitutes a 'reservoir' of pigment and helps to ensure uniformity
in the batch of prints. A soft-haired brush would allow the pigment
(which, being made with paste, is rather sticky) to accumulate in the
crevices of the block; therefore the hair must be stiff enough to
keep these clear, but not so coarse as to leave streaks in the
pigment on the surface of the block. With such brushes no 'painting'
on the block is possible; indeed to 'paint' on blocks or plates is
contrary to the nature of any form of printing.
are flat underneath. Their bulk
constitutes a 'reservoir' of pigment and helps to ensure uniformity
in the batch of prints. A soft-haired brush would allow the pigment
(which, being made with paste, is rather sticky) to accumulate in the
crevices of the block; therefore the hair must be stiff enough to
keep these clear, but not so coarse as to leave streaks in the
pigment on the surface of the block. With such brushes no 'painting'
on the block is possible; indeed to 'paint' on blocks or plates is
contrary to the nature of any form of printing.
The Japanese brushes, as supplied by their makers, are not finished ready for use. In Japan the printer himself undertakes the final stage in their preparation, which consists of singeing and afterwards abrading on shark's-skin the tips of the horse-hair bristles, and takes more time than the artist printer can afford to give to it. An ordinary house-painter's black-haired varnish brush is a possible substitute, but special brushes are obtainable made to one's specification. Brushes should be bought only on the understanding that the bristles are set in rubber, in order to ensure that they will withstand frequent washing in water. About four sizes are required, two inch, one-and-a-half inch, one inch, and half an inch, and much time is saved by having several of each size.
THE BAREN, OR PRINTING PAD
Various substitutes have been devised, but none can compare with a good Japanese baren. These can be obtained from most dealers in artists' materials.
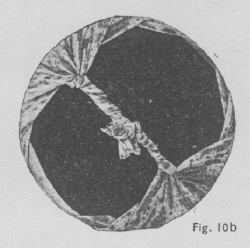
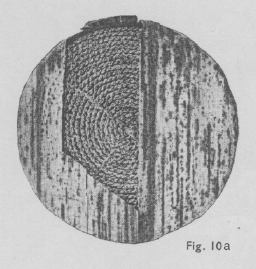 The baren consists of a thin, rimmed disc of
papier mache, into which is fitted a coil of tightly-plaited bamboo
fibre. Various sizes are made, from about four to six inches in
diameter. The whole is encased in a bamboo leaf, wrapped and folded
in a very ingenious manner, with the ends twisted and tied together
to form a handle on the back (see Fig. 10). The spiral coil is made
in about three degrees of coarseness, to suit various thicknesses of
paper and fineness of cutting. (An inferior type is sometimes met
with, in which the coil is made of twisted grass. This should be
avoided, as it is too soft to grip the paper effectively. When
buying, one can detect these grass coils, through the bamboo leaf
covering, by their softeness and want of resilience.)
The baren consists of a thin, rimmed disc of
papier mache, into which is fitted a coil of tightly-plaited bamboo
fibre. Various sizes are made, from about four to six inches in
diameter. The whole is encased in a bamboo leaf, wrapped and folded
in a very ingenious manner, with the ends twisted and tied together
to form a handle on the back (see Fig. 10). The spiral coil is made
in about three degrees of coarseness, to suit various thicknesses of
paper and fineness of cutting. (An inferior type is sometimes met
with, in which the coil is made of twisted grass. This should be
avoided, as it is too soft to grip the paper effectively. When
buying, one can detect these grass coils, through the bamboo leaf
covering, by their softeness and want of resilience.)
Re-covering the Baren. A good bamboo coil in its disc will last a lifetime, but the outer cover needs renewing from time to time. With care, and the good fortune of obtaining a tough leaf, one covering will easily last through the printing of a big edition of an elaborate print. It is desirable, but not necessary, to have more than one baren, and it is as well to get half a dozen new leaves when buying your baren.
Remove the old leaf gently, so that it can be used as a model for shaping the new one; after soaking in water it can be spread out flat. Thoroughly soak the new leaf overnight, then gently spread it out flat and wipe it dry, both inside and out. Next place the disc upon it and, with a very sharp blade, shape the new leaf as shown at A, Fig. 11. (It will be found that one end of the leaf is much finer than the other; this can be equalized by leaving the fine end wider than the thick.)
Place the shaped leaf flat on the corner of the table with the disc upon it, and, whilst holding the disc down firmly with the left hand, with the right hand fold the first quarter, 1, to lap over the back of the disc, working towards the handle portion. Then do the same with quarter 2, remembering the form of your old cover, or referring to a spare baren as a model. Twist up the handle portion and hold it down with the left hand (B, Fig. 11). Turn the whole baren round as at C, taking care to prevent the disc from slipping at all from under the folded portion. Quarters 3 and 4 can be folded over in their turn, and the second portion of the handle twisted with the same twist as the first.
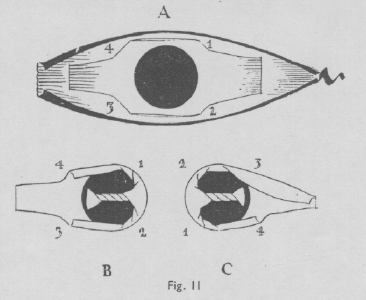
The handle portions should now be pulled tightly together and tied firmly with strong, fine string.
The leaf shrinks in drying, and should be firm and smooth to use next morning.
Before using, smear the front with a little olive oil and rub on a pad of oiled printer's blanket or coarse muslin (described later).
To distribute the wear, the disc and coil can be slightly moved round from time to time, inside the covering leaf.
COLOURS
Powder colours of finest quality are used. They should be finely ground and only permanent ones selected. They are mixed with water only, the rice paste medium being added on the block. The properties of the actual colours are more evident than in prepared oil or watercolours, and one is more conscious of whether they are earth, vegetable, or chemical substances. One soon learns by experience how each can be most effectively used. They are best stored in small, wide-mouthed jars made of clear glass, with corks or screw tops, such as empty vaseline or poster colour pots. It is useful to have a fairly comprehensive stock of colours, although a strictly limited 'palette' is advisable for any one design. The following colours will form a satisfactory selection to start with. They all print well, but viridian needs the addition of a drop of gum, to the water with which it is mixed on the slab.
- Aureolin
- Cobalt
- Yellow Ochre
- French Ultramarine.
- Light Red
- Monastral Blue.
- Alizarin Crimson
- Viridian.
PREPARATION OF INK
A most valuable pigment is Chinese (or Indian) ink. It is used not only for the grey key-block line and for the rich blacks characteristic of the colour-woodcut, but also for delicate grey tones unobtainable from other pigments. Even when used at full strength the ink does not obscure the quality of the paper.
A stick of good quality Chinese ink should be broken up into small pieces with a hammer. Break it between folds of newspaper or the chips may scatter. If, however, the ink is bought in broken fragments, care must be taken to see that it is not of coarse quality. The broken-up ink should be put in a shallow bowl and covered with water to soak out the glue. The water should be changed each day for three or four days. Then drain off the water and 'mash' up the now jelly-like ink with a broad palette-knife on a glass slab. Store it in a wide-necked bottle with a good cork. In order to prevent its going bad, a small pad of unsized printing paper (or of blotting-paper) must be fastened with a tin-tack to the under-surface of the cork. This pad should be soaked with creosote from time to time. Treated thus, the ink will keep at least two years.
White paint is usually unnecessary, as the paper is left to supply this tone. (See Plates I, II, Ill, and IV for use of unprinted paper.) It is also unsuitable to mix white with colours, as it destroys that transparency in the printed colour which is one of the charms of the medium. Moreover white paint confuses the tone scheme, as the colours change in value in relation to the paper according to the direction from which the print is viewed. The addition of a little white to a colour may sometimes be necessary, however, to produce a tint otherwise unobtainable.
For work of a decorative character metal powders may be used, with gum instead of rice paste.
THE PASTE
The vehicle used with the colours is a rice flour paste, which should be of best quality and very finely ground. An excellent kind is Cream of Rice, put up in packets and obtainable from any good grocer.
A heaped teaspoonful of this should be mixed to a thin cream with a little cold water under a slowly dripping tap, and then mixed with three-quarters of a teacupful of hot water in a small saucepan. Stir over a gentle heat until it just boils and thickens. Allow it to simmer very gently for about three minutes, but if it seems too thick cautiously add a few teaspoonfuls of water whilst it simmers. When hot it should not be thicker than thin cream, and when cold should hardly set into a jelly. As a preservative about five drops of 40 per cent Formalin may be added to the water of which the paste is made, and it will then keep for three or four days; otherwise it must be made fresh daily. As an alternative to Formalin, a small pinch of boracic acid may be added. The paste is best conveyed to the block with a small stick, such as the handle of an old oil or water-colour brush.
MIXING OF COLOURS
The colours are mixed with water with a palette-knife on a slab of glass. It is desirable to have four of these slabs - about 12 in. x 7 in. and 5/16 in. thick is a convenient size. White 'opal' glass is best, as this enables the colours to be judged in relation to white. Metal palette-knives are less clumsy than horn ones, but they must be wiped clean of colour immediately after use, otherwise they may rust and affect the colours.
Keep a good supply of cotton or linen rag for various uses during printing. It should be soft and absorbent, and free from loose fragments of lint.
THE PAPER
Japanese paper is undoubtedly the best to use. It has been evolved to meet the needs of the process. There are two main kinds of this paper:
Hosho: A soft, absorbent paper, white in colour - or nearly so - and matt in surface quality. It is particularly responsive to printing from wood, as its soft surface takes an impress of the grain of the wood, giving vibration to the colour. Its absorbent nature causes it to dye right through to the back.
Torinoko: This is not so absorbent, having a smooth surface. Its strength and compactness make it suitable when heavy and repeated printings are required. It can be obtained in various tones, from white to deep cream. It is built up of layers, a property which makes it useful for transferring the design from one block to another as already described.
Both these papers are made in various thicknesses and, with the Japanese tissue used for the key-block drawing, can be obtained from most of the artists' colourmen.
SIZING OF PAPER
Both Hosho and Torinoko require sizing before being printed upon, to ensure evenness of quality in the colour and also to enable them to withstand the rubbing of the baren, and prevent the fibres of the paper from sticking to the block. They are sized with a solution of leaf gelatine (obtainable from any grocer), made in the following proportions:
|
|
|
|
1/2 oz. gelatine |
1/4 oz. gelatine |
|
2 pints water |
2 pints water |
|
1/4 oz. powdered alum |
1/8 oz. alum |
To make the size, put the required amount of water in a thick saucepan over a gentle heat. Add the gelatine, stirring continually. The water should not be more than warm whilst the gelatine is dissolving and should not be allowed to get near boiling point, though the size is best if used hot. Before using, strain it through a fine cloth, such as a handkerchief, into a vessel such as an enamelled pie-dish, convenient for the wide sizing-brush, which should be about four inches wide. A hoghair varnish brush is excellent, but a small whitewash brush will serve.
Hosho paper need be sized only on the front. Torinoko, being less absorbent, must be sized back and front, and the back must be done first. It is for this reason that a weaker solution of size is used.
Arrange a large, clean drawing-board in a slanting position (about forty five degrees from the horizontal), with a pie-dish of the sizing solution immediately below its lower edge. To prevent the first sheet of paper from slipping on the dry board, slightly brush the latter with size. Place the paper on the board, holding up the lower margin of the paper with the left hand. Then - starting at the top - brush the solution evenly across and across the paper until it is damped all over, making all the strokes from left to right. The paper should not be flooded with size, but it must be uniformly and generously soaked. Use the brush lightly and gently so as not to disturb the surface of the paper. The left hand is gradually lowered until, at the last stroke, the paper lies flat on the sloping board. Place the second sheet of paper on top of the first and proceed as before, and continue thus until all the sheets are sized. Leaving the sheets one above another will help to ensure even damping throughout. But soon after the last sheet is sized they should be hung up to dry, or they will stick together.
For drying, the prints may conveniently be pinned to a picture rail or table edge, or strings may be stretched from side to side of the room and the paper hung with spring-clip clothes-pegs. Whilst the paper is damp flaws may be removed with fine tweezers, the paper being placed on a sheet of clean glass or rubber cloth.
During both the sizing and the hanging care must be taken to avoid wrinkling the paper, as creases cannot be eradicated.
CUTTING UP OF PAPER
When the paper is dry the correct number of sheets for the batch should be cut to the required size, allowing for margins as described on earlier. When the paper is lying face downwards, the bottom righthand corner must be an accurate right angle, and the near edge quite straight, to ensure correct register. A steel straight-edge is almost a necessity, and a safety-razor blade fitted in a handle is useful. Cut on a piece of strawboard or plywood. If a guillotine is available a large number of sheets may be cut at once. Or a very good alternative is to cut simultaneously through a number of sheets held firmly in place on the cutting board by drawing-pins along one edge. Rule out the dimensions on the top sheet, and cut with a sharp blade, leaving the pinned edge to be cut last. The pile of sheets will remain firm until the fourth and final side is cut.
TO DAMP THE PRINTING-PAPER
Place on a sheet of plate glass one of the 'damping-sheets'. These are sheets of tough, unsized printing-paper, cut rather smaller than the glass. Torinoko is very good, or, failing that, sheets of newspaper cut down to the right size will do. Damping-sheets last almost indefinitely if dried after use.
Damp the sheet with the sizing brush, using strokes from left to right. Place three sheets of the printing-paper on this, then another damping-sheet. Damp this also, with strokes from top to bottom of the sheet. Then add three more printing-sheets, and so on until all are between damping-sheets, with another sheet of plate glass on top. The damping sheets must be lightly and evenly damped but should not be soaked. About ten drops of Formalin to a pint of water used for this will prevent mould for a week or more. Sheets of plate glass are much to be preferred to drawing-boards, which absorb the dampness and are themselves gradually ruined by warping. In order that the fibre of the paper should have time to soften, it is best to leave the printing-paper to damp overnight.
It is essential for successful printing that the paper should be of the right degree of slight dampness. It should be so nearly dry that it is not limp when lifted.