Yoshida - Japanese Woodblock Printing : Chapter III : Part II
Japanese Wood-block Printing
Hiroshi Yoshida
CHAPTER III
(continued)
Implements and Materials
Baren
Now let us consider the tools used in printing. The first in importance is the baren. The term now consists of two characters: ba meaning sheath (sheath of bamboo) and ren, succession. These may not be the original characters used. The term may be foreign to the soil. In Manchoukuo a kind of iris is known as ma-ren, and ma is often blurred into ba in Japanese. This plant may have been originally used in making this implement which has so acquired its name. The origin of the baren is not clear. Perhaps it was introduced into Japan by the Chinese who came over to Japan and cut Buddhist sutras on wooden blocks and printed from them in the Muromachi Period (1334-1572). But no mention of it is made in literature.
The baren is the soul of the printer. All the secret of print-making may be said to be contained in this circular pad used for rubbing in printing. It contains a disk made of cord which has marvellous qualities for use in printing - persistence and durability. The cord, which is made of the fibre of bamboo sheath, outlives metal wire. It can be used over and over again by reversing it or rewinding the cord. Bamboo-sheath as used here shows its wonderful properties. It is absolutely essential; no substitute can be found. All sorts of tricks in printing can be performed with this baren made of and covered with bamboo-sheath.
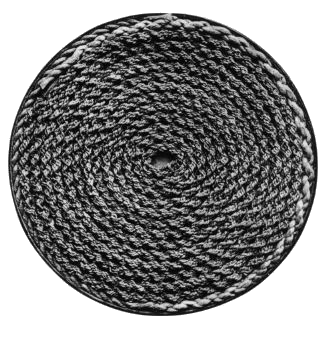
Figure 15
Baren of sixteen-strand cord
This has been used by the author for several years. The cord forming the outer ring is of paper, and the rim of the ate-gawa is shown on the outside.
The baren contains a circular mat or coil of cord made of bamboo-sheath. There is an elderly woman in Meguro in the outskirts of Tokyo who is skilled in making baren, having been working at it all her life. The strong even fibre of the best part of the bamboo-sheath of a species known as shiratake is entwined to make the cord. It is made by entwining strands of the bamboo sheath fibre taken from only a small portion on either side of the middle strip running the full length of the sheath, the fibre of which is too coarse to use. The fibre is too coarse also at the root end, so the best parts for the fibre are limited to a small area five or six inches long within the root end half of the bamboo-sheath. A two-strand cord is doubled to make it a cord of four strands. Some baren are made with a cord of four strands and others of eight. Rarely one with twelve strands may be seen and I had one made specially with a cord of sixteen strands.
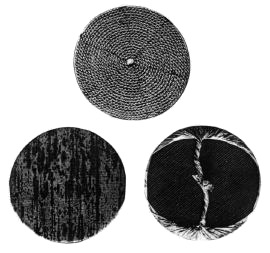
Figure 16
Baren: three aspects
Top: Baren of four-strand cord, uncovered
Left: Underside of the baren, showing the bamboo-sheath covering it.
Right: Top side of the baren, showing the handle over the ate-gawa.
The back or cover, in which the mat is held, is made of paper (take-naga) by pasting many sheets of strong thin paper together one over the other in many layers in order to give sufficient strength and flexibility. Each layer of paper is applied when the previous layer is perfectly dry and the thickness should be about one-sixteenth of an inch. This cover is so made that it is slightly thicker in the middle, having more layers of paper there than on the outer portions. It is very important that it should be thicker in the middle in order to give the necessary pressure when rubbing it on the back of the paper. The outside of this thick paper cover is covered with sha, a thin but coarsely woven silk, and lacquered to make it durable. Around the edge the thick cover is slightly curled up to hold the disk of cord in position. This cover is called ate-gawa.
The surface of the baren is not even: it has any number of projections caused by the angular corners of the cord. These corners are valuable in rubbing the paper against the block, and driving the pigment into the paper from the surface of the block. This gives a peculiar quality to the print. I have used a baren especially made of a material other than bamboo-sheath - one with the coil made of entwined rice-straw for obtaining a rough impression. This was used as an experiment, but was found not nearly so good as the bamboo-sheath baren in actual use. Some I had made of entwined Japanese paper. This can be used to give a special effect in printing. Even the usual kind of baren with bamboo-sheath has the last part of the spiral, the outer part of the disk, made of twisted paper, in order to give soft edges to the baren and that at the same time to better preserve the bamboo-sheath covering.
Baren of different degrees of coarseness may be used in getting similar results from the same set of blocks when the condition of the paper is different. The desired effect from certain blocks may be better obtained by using a different baren.
Wrapping the baren, or coil of cord with bamboo-sheath, is very difficult. The bamboo-sheath is dipped into water and allowed to soften; more water is applied to the inside of the sheath, with a brush if necessary. The sheath comes all curled up - it curls up of its own accord and breath is blown into it to soften it. Then it is placed on the knee or on a flat board (meko-ita) with the inside up and pressed flat, being stretched by rubbing it inwards with the side of the right hand and outwards with that of the left. When the portion to be used is sufficiently soft and flat it is rubbed with the rounded end of a pair of scissors from both sides across the fibre on the meko-ita. A smooth black stone may be used for the rubbing, instead of the scissors. Then the coiled mat, covered first with ate-gawa, is placed on it as indicated in the drawing.
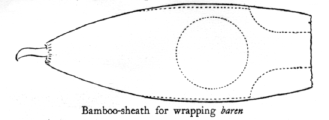
Now the ate-gawa containing the coil being properly placed over the stretched bamboo-sheath, we proceed to wrap it. The unnecessary width of the sheath may be torn away. Begin working from the root end of the sheath.
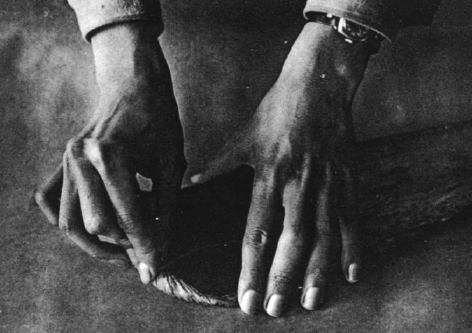
Figure 17
Beginning the wrapping of the baren from the root-end of the bamboo sheath.
Cut off both edges with the scissors as indicated by dotted lines in the drawing, for the root part of the sheath is too bulky for all of it to be made into a handle; and while pressing down the mat on the sheath, begin wrapping the baren from the right-hand side, twisting the edges as one proceeds as shown in the illustration. When this is done, then start from the left-hand side likewise and twist that end to make a part of the handle. The process is reversed on the other end: the difference, however, is that it is not only necessary to cut off the side, but to strengthen it with an extra piece of bamboo-sheath, for the upper portion of the sheath is not so bulky. This end must also be twisted, and the twisted sheath from either end should be tied together at the middle of the disk with a string to form a handle. The sheath should be wrapped tightly so as to give a firm hold. Even then it should permit the disk to turn around within the bamboo-sheath cover in order to allow the uniform use of the baren. Then the surface should be oiled slightly and rubbed against a board (meko-ita) to make it smooth and fit for the rubbing of the paper in printing.
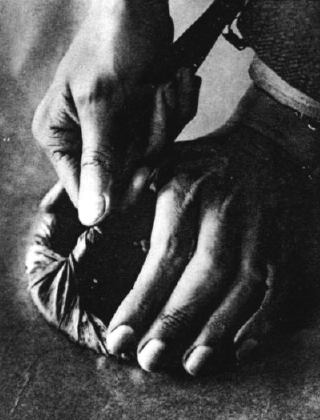
Figure 18
Finishing the wrapping by pressing the baren down firmly with the left hand to tighten the wrapping and twisting the sheath with the right hand to form a handle.
A rather thin bamboo-sheath, without coarse fibres, should be chosen for wrapping the baren. It must not be too thick, for if so the efficiency of the coil inside will be lost when printing. The sheath of the species of bamboo known as madake grown in Kyushu, in the southwest of Japan, is considered best for this purpose. It is produced also in Mito in the northeast. Reddish yellow sheaths are decidedly preferable to dark ones, and they should be somewhat oily and not dry and brittle.
Sometimes the bamboo-sheath covering the baren is worn out in a single day of hard printing. Then it should be renewed. Thus it is seen to be essential that the artist who prints should be able to wrap baren, though the art is difficult to acquire and not easy to do. The wrapping of the baren is so difficult and requires such art that a man's ability as a printer may be judged by his skill in this particular work.
Selection of Wood-Blocks
It is essential that a right judgment be formed as to the boards from which to cut the blocks. Some boards are excellent for colour blocks, while others are better suited for the outline drawing, or sen-gaki.
It is necessary for the key block with the outline drawing on it to be hard, uniformly hard and free from warping, besides being well seasoned. It must be dry, so that it will not shrink or expand; uniformly hard, because fine lines are to be cut and these lines must be able to stand repeated printings.
The key block should be cut on the side of the board which will be the concave side when it warps. This is because it is usual for the colour blocks to diminish in size. We know that a wooden board naturally warps in such a way as to have its year-rings straight.
The outer part of the wood, the part near the bark, is generally whitish and soft and absorbs more pigment; hence produces a deeper colour in printing. The knots are hard and do not absorb pigment. Where the lines of the grain are parallel and close together, the wood is of uniform hardness. Marks showing the existence of knots, and also the specks and streaks of different colours, except when these marks are caused by rotting, are generally indications of the hardness of the wood.
For tsubushi-ban, or a block for printing a large flat area, the wood should be soft and uniform, with masame (parallel graining) off the centre, free from knots, specks and streaks of different colours. Yet that is not always the case. Some cherry-wood boards are soft even if their graining is not close and parallel. These boards are hard to select. In choosing them the artist should judge by (a) the weight, (b) the touch, and (c) the looks of the board. The heavy, hard looking ones will be suitable for the key-block. On one occasion I tested boards by charging the surface with pigment and printing from them, but none of them gave convincing results. In fact, all the boards appeared unsuitable. It would have required twenty or thirty impressions to assure myself of the real value of each board, but as that would have meant a sacrifice too great to be borne, I gave up the test. A perfect block is not easy to obtain, and certain flaws may be overlooked according to the drawing to be cut. Generally speaking, the reddish cherry-wood is preferable to the greyish variety. The sheen on the surface generally reveals the hardness of the wood.
An especially hard piece of board is required for the key block. The best uniform board is to be used for the tsubushi-ban. The next best piece of the board is to be used for colour blocks. The poor part may be utilized for cutting small details in the drawing. Sakame (reverse grain) which naturally occurs and kanna-mura (uneven planing) should be carefully noted.
If a landscape with figures is to be made, and if a bad spot should come in the face of a figure, or appear in the clear sky or water, it is best to reject the block and cut another. Often a reserve is cut for the sky for an emergency. Or sometimes the defects may be overcome by applying more pigment on the block in printing, for printing with less pigment accentuates defects. Sometimes I have rubbed the hard part of the block with nagura whetstone in order to roughen the surface and unify the results.
It is hard to find a perfect piece of board, and so the best use must be made of poor ones. Care must be taken to utilize the poorest ones first so that the best ones may be reserved for the more important blocks. Some of the defects are difficult to detect; they show themselves only when we come to printing.
Brushes
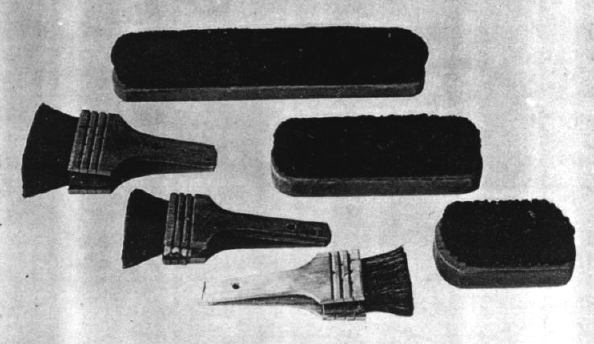
Figure 19
Brushes for Pigments
Top: Used for the shading or blending of a large area. About 1 foot long.
Right middle: About 7 1/4 inches long.
Right bottom: About 4 3/4 inches long.
Left top: About 3 1/2 inches long.
Left middle: About 3 inches long.
Left bottom: About 2 3/8 inches long
For the brushes horse hair is used; from the mane and not from the tail. The hair of the brush should be two or three inches long; the ends singed, and the hair tied with string about half an inch from the tip. By rubbing this against the shark skin for half an hour, the end of each hair splits and the points become finer and softer. If fine soft hair, like that used in the Japanese writing brush, is chosen to begin with, it does not give sufficient strength in applying pigments on the block. Care must be used in rubbing the brush against the shark skin; it should be so done that the middle part of the brush is left slightly longer and the edges are somewhat rounded. This is to help in rubbing the pigment over the block.
The shark skin comes dry, hard, and all curled up. It needs to be soaked in water over night, and then stretched over a board and glued or nailed down.
When the printing is finished the brush should be well washed and dried. Before beginning to use it, it is better to moisten it first with water. It should be borne in mind that a small quantity of the pigment used generally remains on the brush, though this may have been washed; so it should be used only for a similar colour.
The brush is moistened first so that the pigment placed on it may sink in. It is necessary for the brush to be more or less saturated with pigment to insure uniformity of colour in the prints.
A small special brush, known as tokibo, made of either bamboo-sheath with its end crushed or by tying shuro (palm) fibres together is used for stirring the pigment in the bowl and for applying it either to the block or to the brush as the case may require. But in either case we put paste on the block to be rubbed over the block together with the pigment.
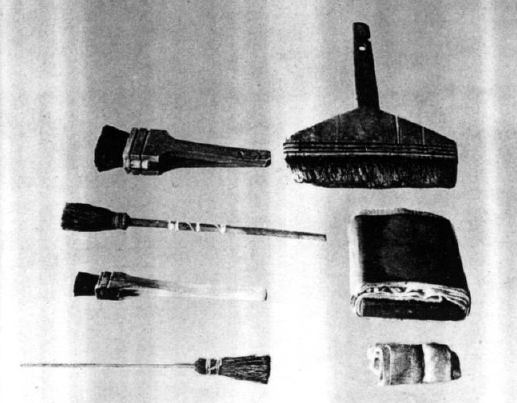
Figure 20
Brushes and rags
Left top: Brush for pigment. About 1 1/4 inches long.
Left, second from top: Tokibo, about one-half the actual size; old.
Left, second from bottom: Brush for pigment, slightly longer than half an inch.
Left bottom: Tokibo, new.
Right top: Hake, for water.
Right middle: Zokin (wet cloth) containing a piece of wooden board inside and clamped on top by a piece of sheet bronze. The underside which is not shown is utilized.
Right bottom: Zokin (wet cloth) folded and tied with a string.
Odds and Ends in Printing Studio
A small jar of paste should contain a tiny stick, and another small jar containing oil should be provided with a stick with a piece of cotton tied to the tip.
We have already noted that the mae-bako in front of the artist should have a shelf for paper facing the artist, the box being closed except on one side. Two or three sheets of moistened paper should also be placed on the shelf in the mae-bako so that the prints may rest on them.
The suri-dai, or low stand for the blocks used for printing, should slope down about twelve degrees away from the artist. The stand should have a vacant space under it for paste, etc. A small jar with oil should be placed on the other side of the printing stand under the shelf of the box in front.
On the side of the printing stand a pad of slightly oiled cotton is placed for the baren to rest on. Beyond it on the printing stand a tile is placed to hold the wet towel which is used in making the shading in the print.
The mekuri-dai is used for the prints. This stand should be a box for all sorts of odds and ends needed occasionally. The box should have on top of it an ate-ita (hard piece of board) with two or three sheets of moistened thick paper. Upon this prints will be placed as soon as they are taken from the block. This box and the ate-ita constitute the mekuri-dai.
There should be a yoko-bako on the right - a low box containing a pair of scissors, kui-ki (thin pieces of cherry-wood for remaking the register marks when necessary), a chisel, a saw, a piece of string, etc. On the top of the yoko-bako the pigment, as well as some of the things just mentioned, are placed.
When the artist is printing there ought to be within easy reach the following odds and ends, some of which have already been mentioned:
Dry tokusa (pewterwort) comes in handy for rubbing the surface of the board. They are dried and pasted on a board to be convenient for use.
The low box serving as a side table should also contain a toh (knife), ai-suki, a kind of marunomi (semi-circular chisel) that can be used with one hand without a mallet, a nomi (chisel), a kento-nomi for changing the register marks, and a small saw for cutting off surplus parts of the kui-ki used for inlay which becomes necessary sometimes in the course of printing to correct the defects in the block.
Makura, or yawara, cushions of rags or of folded damp paper, to be used under the four corners of the block.
Brushes for colours, of various sizes according to need.
A tokibo, a sort of brush made of bamboo-sheath and kept in the jar of pigment.
A nyabachi (mortar) for grinding pigments.
A basin or bowl for water.
A hake, or Japanese paste brush about five or six inches broad, for moistening the paper.
A wooden board, a ruler and a thin, broad knife, several inches across, for trimming the paper on two sides to get a corner which is a perfect right angle to fit to the similarly marked register mark.
A pile of newspapers to be used for various purposes such as inserting between prints when drying or moistening them.
Rather a large piece of flannel for covering the pile of paper to keep the moisture from evaporating.
Cardboards to be inserted between prints when drying them.
A magnifying glass for examining defects.
Sheets of paper on which colours may be tried.
Towels and rags to be used for wiping the block for gradations, etc.
A waste-paper basket.
Candles and matches.
A few nails and a mallet.
Ate-ita wooden boards on which to keep the prints.
Gold, silver and mica in powder form, which are essential, must never be used in the room while the printing is being done, for some of these powders might stick to the print.
A smoking set, if the artist smokes. As a small particle of tobacco will discolour a print, care should be exercised.

Figure 21
Diagram showing the position of the artist when printing, his implements and the materials used.
1. Wood-block. 2. Mae-bako (front box) 3. Suri-dai (printing stand). 4. Mekuri-dai, for placing the printed sheets on. 5. Yoko bako, or side box with a drawer. 6. Zabuton, or cushion upon which the artist sits. 7. Basin with water and brush. 8. Bowl with pigment and tokibo. 9. Kento-nomi, or chisel used when changing the register marks. 10. Kuiki, or pieces of wood used when changing tbe register marks. 11. Brush for spreading pigment on the block. 12. Zokin (wet cloth) on a tile. 13. Baren on a slightly oiled piece of cotton. 14. Oil container. 15. Jar of paste. 16. Wet-rag cushion. 17. Bottom sheet of paper. 18. Printing sheets on the shelf inside the box. 19. Printed sheets "crawled" 20. Drawer with necessary tools.
