 PINIONS
differ as to the distinction between the woodcut and the
wood-engraving. Some people call a design on a woodblock a woodcut
when the unit of expression is the black line; a wood-engraving when
it is the white. For example: a block cut in facsimile of a pen and
ink drawing would be called a woodcut regardless of whether it had
been cut with knives and gouges or with gravers. By the same token, a
design in white line made by either gravers or gouges would
constitute a wood-engraving. If a distinction must be made I would
call a design in wood made with knives or gouges a woodcut regardless
of whether the printed lines were white or black, and also regardless
of whether the work was cut on a soft-wood plank or in an end-grain
block of hard wood. A wood-engraving would be a design made with
gravers. As the nature of these tools limits their manipulation to
hard, end-grain woods which are capable of far more detail than
planks, it follows that only such blocks might truly be called
wood-engravings. Yet I have used gouges entirely on endgrain maple
and box with the white line as the unit, so that the results were
really woodcuts!
PINIONS
differ as to the distinction between the woodcut and the
wood-engraving. Some people call a design on a woodblock a woodcut
when the unit of expression is the black line; a wood-engraving when
it is the white. For example: a block cut in facsimile of a pen and
ink drawing would be called a woodcut regardless of whether it had
been cut with knives and gouges or with gravers. By the same token, a
design in white line made by either gravers or gouges would
constitute a wood-engraving. If a distinction must be made I would
call a design in wood made with knives or gouges a woodcut regardless
of whether the printed lines were white or black, and also regardless
of whether the work was cut on a soft-wood plank or in an end-grain
block of hard wood. A wood-engraving would be a design made with
gravers. As the nature of these tools limits their manipulation to
hard, end-grain woods which are capable of far more detail than
planks, it follows that only such blocks might truly be called
wood-engravings. Yet I have used gouges entirely on endgrain maple
and box with the white line as the unit, so that the results were
really woodcuts!
In this chapter we shall refer to work cut on a plank with knife or gouges as a woodcut, although elsewhere in the book the word woodcut is used indiscriminately - chiefly because I like it better than wood-engraving.
 The
difference between the graver or burin, a tool used earlier on the
copper plate, and the gouge is that in the former the cutting head is
solid, whereas the gouge is grooved and the cutting is done with a
lip. See Fig. 14. A and C
are the business ends of gravers; B and D of gouges. The graver pushes
out the wood; the gouge actually cuts it. Now the graver can be used
to good effect only on the end-grain of hard wood - the transverse
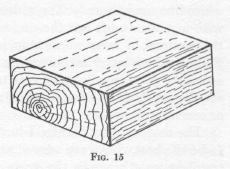
section of a tree (Fig. 3); the cutting tools, knife and gouge, are
used to best effect on planks - the longitudinal section of a tree
(Fig. 15).
The
difference between the graver or burin, a tool used earlier on the
copper plate, and the gouge is that in the former the cutting head is
solid, whereas the gouge is grooved and the cutting is done with a
lip. See Fig. 14. A and C
are the business ends of gravers; B and D of gouges. The graver pushes
out the wood; the gouge actually cuts it. Now the graver can be used
to good effect only on the end-grain of hard wood - the transverse
section of a tree (Fig. 3); the cutting tools, knife and gouge, are
used to best effect on planks - the longitudinal section of a tree
(Fig. 15).
 Gouges
can be used on end-grain woods, but owing to the fragile nature of
the cutting edge, they are all too easily damaged - especially the V
cutter. A woodcut may be made on a cigar-box with a pocket knife, but
there is no particular reason for putting obstacles in one's path,
when the necessary tools can be had so easily and cheaply.
Gouges
can be used on end-grain woods, but owing to the fragile nature of
the cutting edge, they are all too easily damaged - especially the V
cutter. A woodcut may be made on a cigar-box with a pocket knife, but
there is no particular reason for putting obstacles in one's path,
when the necessary tools can be had so easily and cheaply.
Gouges may be purchased from Kimber in London, from Muller or from Loeffler. From Kimber I would say the most useful to be:
      Small gouge No. 4792	        1/6
      Medium deep gouge No. 4795	1/6
      V cutter No. 4797	                3/0
Muller offers four linoleum tools at $2.00, or fifty cents each for the large, medium and small round gouges, and seventy-five cents for the V cutter when bought separately. Loeffler's tools have wood-carver's handles. The most promising are No. 4, No. 6 and No. 9, all round gouges, and No. 10 the V cutter - the four at $2.20.
Writers on the art make a great point of the knife. Knives can be had from Bingler or Hammacher or from Kimber. It appears to have been the implement used by the early woodcutters, and seems to be still the main reliance of the Japanese craftsmen or their imitators. If one is going to pursue the black line or facsimile pen-and-ink drawing effect, it may be a better tool than the V cutter and gouges. I never use a knife myself. I am of the opinion - just a personal notion - that the gouge or the V cutter is the more logical weapon to use, and with it more distinctive work may be achieved. Certainly to get some effects, say like the radiations on the toad-stool the knife would have made a tedious job of it, where with the V cutter it was sheer pleasure. That is the way to work - to get pleasure out of it. Adherents of the knife claim it takes two slices to make a thin white line, and three for the wider ones - two with the knife and one with a gouge to lift out the undesired surface. And I have read that the removal of large areas may be expedited with mallet and chisel. Perhaps these latter machines are used by fine craftsmen. It does not seem like good psychology to me to pound at a medium that generally requires such dainty handling. But that is the old question of lemon or cream in your tea.
For woodcutting planks, I have found apple wood and pear wood to be the best. Both are very close-grained woods, having remarkable tensile strength across the grain. The early woodcutters used pear. Holly and cherry are good, but looser-grained and softer than the other two. Japanese cherry is considered much superior to the American. Gum is good in that like the other woods mentioned the slices cut by the gouges break off short, but gum blocks have an unfortunate tendency to twist. Lilac wood would be fine - either as an end-grain block or as a plank, if one could come by it in large enough pieces. Orange, birch and hickory are all too fibrous when not too open in grain. Maple less so. It is an endless task to cut off the hair-like fibers left in the wake of all cuts made in the longitudinal direction of the blocks of the above-mentioned four woods. Pine, bass and poplar can be used for broad effects. They are much too crumbly for detail. This friable condition can be remedied to some extent in these and other woods by applying a good coat of boiled linseed oil over the surface - turpentine being added to hasten drying. As mentioned in the previous chapter this will act as a binder of the wood cells, make for smoother cutting, and at the same time reduce the tendency towards warping by keeping moisture out of the block.
The softer the wood the keener the cutting tools will have to be and the broader the effects.
In this day of fancy and expensive machinery it is almost impossible to have things prepared that in a less industrialized age would have presented no difficulties. I don't know where in a large city one could get a log of apple wood cut into planks. If it could be done at all it probably would cost dearly. One would have to pay for the making out of orders and requisitions and autographing countless documents and making countless book-keeping entries, and in the end pay the office half a week's wages to get fifteen minutes of actual mill work done. In smaller towns the job could be done within reason at any saw mill. I don't know where apple or pear blocks can be bought. Those I've used were prepared by myself from the tree. The wood is used commercially for saw and chisel handles. If you are handy with ax and saw and have a tree to spare perhaps you could cut your own blocks. It will be necessary to let the wood season thoroughly but not out in the direct sunlight. To prevent checking, i.e., splitting into cracks at the ends, where drying goes on fastest, the ends should be painted with any thick oil paint, tar or glue. Water-glass would do - anything to keep air from the surface. In sawing the planks allowance must be made for warping, and therefore they should not be less than 1 1/8 of an inch thick in the rough. Seasoning wood is a little science in itself. When finished for cutting - planed and scraped - the blocks should be type-high, which is a trifle more than 29/32 of an inch thick. The nearer the top and bottom surfaces are to being parallel the less trouble there will be in printing. If the proofs are to be made by burnishing instead of on a press there will not be the same necessity to parallel the bottom to the top, nor to get the surface more than comparatively flat. Old-time workers advised against sanding wood unless no more cutting was to be done on it, for the sand and grit imbedded in the wood dulls tools too quickly. The grit in linoleum is what makes that material so hard on cutters.
Johnson & Co. will prepare some planks to order if the lumber is sent in the right sizes for them to handle. They carry cherry wood in stock. There is a laminated or ply wood, seven-eighths of an inch thick, the top layer of which is a fine grained wood like gum. It is good for some effects.
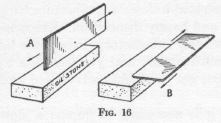 If you
prepare the planks yourself they should be well scraped - flat and
smooth. A scraper, which is a flat piece of steel like a saw blade,
about 2 x 6 inches in size, can be bought at hardware stores, at the
5 and 10 cent store and at mail-order houses. In sharpening these,
the edge is held perpendicularly and moved back and forth over the
oil stone, bearing well down on it. Fig. 16, A. Any little wire edge or an
indentation on the scraping edge is likely to scratch the block and
cause mischief. As an extra precaution for the finishing touches the
scraper should be held flat against the stone, and rubbed back and
forth a few times. Fig. 16, B. The corners had better be
rounded, too.
If you
prepare the planks yourself they should be well scraped - flat and
smooth. A scraper, which is a flat piece of steel like a saw blade,
about 2 x 6 inches in size, can be bought at hardware stores, at the
5 and 10 cent store and at mail-order houses. In sharpening these,
the edge is held perpendicularly and moved back and forth over the
oil stone, bearing well down on it. Fig. 16, A. Any little wire edge or an
indentation on the scraping edge is likely to scratch the block and
cause mischief. As an extra precaution for the finishing touches the
scraper should be held flat against the stone, and rubbed back and
forth a few times. Fig. 16, B. The corners had better be
rounded, too.
The procedure in cutting is like that of wood-engraving. The coating of zinc white and white of egg is put on the face of the block as thinly as possible with a soft flat brush or the ham of the thumb. This stuff even without the egg smells like a hen-house, but it is not a dangerous gas. Or, if you prefer, proceed with the drawing without coating the block. The coating fills the pores in which the drawing ink is likely to "run" and presents a nice toothsome surface to draw on. Try both methods. I prefer to coat and then to stain the drawing for the contrast when cutting.
Gravers can be used on a plank but only in the direction of the grain. But nothing can be done with them in any other direction, so the cutting is done with gouges or a knife. A pocket knife held perpendicularly may be used. To make it easier on the hand it could be wrapped with twine or tape. Care will have to be exercised not to plow too deeply with the gouge or V cutter - especially when close to a black line. If the nose of the cutting tool goes under the surface a ragged cut will result; if it goes under close to a line that is to appear in the print the line is quite likely to be broken.
Apropos, to produce a ragged white line, or a series of them to get, say, an effect of rain on a pavement: A dull tool pushed at right angles to the grain of the block will do the trick.
A good grade oil stone is necessary to keep the tools sharp. A sharp tool imparts a smooth, unctious feel, while a dull one shows reluctance and ungovernableness, with a tendency to slide over the surface rather than to plow into it. Whenever a glint of light is seen on the edge of a cutting tool it is an indication that a closer acquaintance with the oil stone will increase its virtue and happy disposition. Kerosene oil as a lubricant for the stone is perfectly satisfactory, except for its halitosis. If you are sensitive in such matters, and yet feel able to sacrifice otherwise to the cause of art, get the highly advertised and perfumed oil.
 In
sharpening the round gouge it is necessary to impart a slow circular
movement on the stone while still more slowly rocking it in order to
present all of the cutting face to the stone, and at the same time
the handle should swing still more slowly in an arc, so that all of
the cutting face gets an equal amount of abrasion - three definite
movements all at the same time, with the use of grocery store
kerosene oil. See Fig. 17. A 'slip stone' to touch up the groove of
the cutters can be bought at either Paulson's or Hammacher's. It is
not absolutely necessary. Strop off the wire edges resulting from
sharpening on a thick piece of leather in which a groove has been cut
by the gouge, and a side of which has been rounded. The inside and
outside of the gouge is rubbed on the edge and in the groove
alternately until the wire edge drops off. A little very fine emery
could be put on the leather; it would be a fair substitute for the
slip stone.
In
sharpening the round gouge it is necessary to impart a slow circular
movement on the stone while still more slowly rocking it in order to
present all of the cutting face to the stone, and at the same time
the handle should swing still more slowly in an arc, so that all of
the cutting face gets an equal amount of abrasion - three definite
movements all at the same time, with the use of grocery store
kerosene oil. See Fig. 17. A 'slip stone' to touch up the groove of
the cutters can be bought at either Paulson's or Hammacher's. It is
not absolutely necessary. Strop off the wire edges resulting from
sharpening on a thick piece of leather in which a groove has been cut
by the gouge, and a side of which has been rounded. The inside and
outside of the gouge is rubbed on the edge and in the groove
alternately until the wire edge drops off. A little very fine emery
could be put on the leather; it would be a fair substitute for the
slip stone.
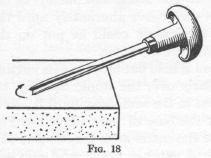 In
sharpening the V cutter the tool is held flat on one of its cutting
faces while moved slowly and circularly over the stone. See Fig. 18.
Then the other cutting face is applied in the same way until it meets
the first sharpened side squarely at the base of the valley. See Fig.
19, B. Fig. 19,
A is an
enlargement of the cutter after the left side cutting face has been
sharpened. Now, if you are not careful you will overdo the job and
get a result like Fig. 19, C, and so must fiddle back to
the right side again.
In
sharpening the V cutter the tool is held flat on one of its cutting
faces while moved slowly and circularly over the stone. See Fig. 18.
Then the other cutting face is applied in the same way until it meets
the first sharpened side squarely at the base of the valley. See Fig.
19, B. Fig. 19,
A is an
enlargement of the cutter after the left side cutting face has been
sharpened. Now, if you are not careful you will overdo the job and
get a result like Fig. 19, C, and so must fiddle back to
the right side again.  When you get the effect shown in Fig. 19, B, and have honed off the wire
edge, and have applied the cutter to the block there may be a
tendency for it to scratch the surface rather than to dig into the
wood. This is because the valley cannot be made perfectly sharp at
the bottom, as you would see if you should look at a V cutter through
a microscope. See Fig. 19, D. It follows that the distance
between the lowest point of the groove and that of the outside point
is greater than at any other place across the cutting edge. So you
will have to round the bottom as shown by the shaded portion. The V
cutter is really a miniature gouge, at the bottom.
When you get the effect shown in Fig. 19, B, and have honed off the wire
edge, and have applied the cutter to the block there may be a
tendency for it to scratch the surface rather than to dig into the
wood. This is because the valley cannot be made perfectly sharp at
the bottom, as you would see if you should look at a V cutter through
a microscope. See Fig. 19, D. It follows that the distance
between the lowest point of the groove and that of the outside point
is greater than at any other place across the cutting edge. So you
will have to round the bottom as shown by the shaded portion. The V
cutter is really a miniature gouge, at the bottom.
The V cutter should have its flares project beyond the bottom, so that in pushing the cutter over the block the cutting is downward against the body of the block. If the flares retreat toward the handle, like the cutting face or nose of the gravers, the effect on the block will be somewhat like using gravers on a plank and cutting across the grain of the wood. There will be a tendency to break up the surface instead of cutting down into it.
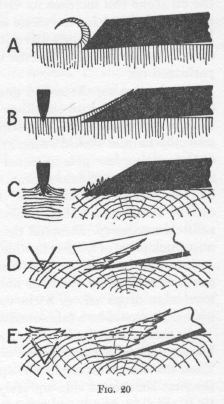 Fig.
20, A represents a graver with a blunt nose. The chips from it
obscure the line immediately in front of it, and in the wider gravers
the blunt nose requires more pressure, which in turn makes it more
difficult to control; B shows a graver sharpened at an angle of about
30 degrees. It is much easier to push, and the chips do not get in
the way of vision; C shows what happens when a graver is pushed
across a plank; D shows the V cutter in action on a plank, and E what
happens when the cutter gets below the surface.
Fig.
20, A represents a graver with a blunt nose. The chips from it
obscure the line immediately in front of it, and in the wider gravers
the blunt nose requires more pressure, which in turn makes it more
difficult to control; B shows a graver sharpened at an angle of about
30 degrees. It is much easier to push, and the chips do not get in
the way of vision; C shows what happens when a graver is pushed
across a plank; D shows the V cutter in action on a plank, and E what
happens when the cutter gets below the surface.
Linoleum cutting would follow pretty much this
same technique. Because of its darker complexion, the surface could
be painted white for the sake of contrast during cutting, and not
dusted with the powdered zinc; or else the surface darkened and the
design made with Chinese white or light water color. Because of its
friable nature linoleum has not the possibilities of
wood.
|
gouges, two or three various sized |
thick leather |
|
V cutter |
wood planks |
|
knife |
zinc oxide |
|
scraper |
fine emery |
|
soft flat brush |
drawing ink |
|
pen and pencil |
white of egg |
|
oil stone |
kerosene oil |
|
slip stone |
|