|
|
|
|
|
|
|
|
The master tracing that will guide the carving is known in traditional Japanese work as the 'hanshita'. Very few of these have come down to us from the historical period, due to the fact that they are destroyed during the process of making the print - the tracing is pasted down onto the wood, and gets 'carved up' as the print is being made.
An important point about the hanshita is that it gets pasted onto the woodblock face down. If you think about this for a moment, you might realize that this face-down system is the way that the image gets 'reversed' for the wood block. (It will later be 'un-reversed' when the printing paper is placed on the block for printing ... also face down ...) Here's how it works:
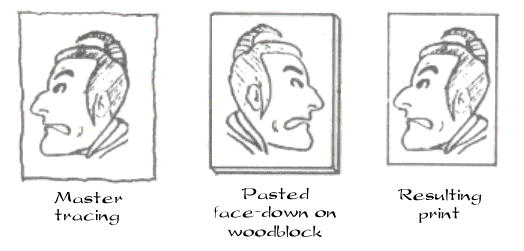
This means of course, that you don't have to worry about drawing a reversed image - if there is any lettering appearing in your print for example, just draw it in the normal orientation, not reversed.
Before we can paste it down on the woodblock and get started though, there is one more very important step to be done - defining the location of the registration marks. Rather than get into a long explanation here of how these marks function, let me just point out that when printing all the colours later on, there has to be some method of getting the printing paper 'lined up' properly. The registration marks provide this method. Exactly how it happens will become clear as you read the following pages ...
Two marks are needed to ensure good registration of the paper. Let's use the same example as above, and show the basic idea:
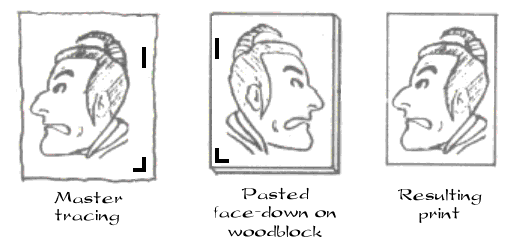
Coming back to our sample print, here's our master tracing, with the location of the registration marks shown:
What kind of paper should you use for your master tracing? In the old days, it was made on an extremely thin type of Japanese paper - so thin that it was almost transparent. I rather doubt that you have any of that paper in your home though, so you will have to use something else. And actually, any normal sheet of reasonably thin white paper will serve the purpose ... as long as you draw the design in a good strong black (a bold black felt pen for example) so that it is visible from the back side of the sheet.
(If you happen to have an oriental grocery store near you, head over there and pick up a roll of the paper that they sell for recovering Japanese paper shoji screens. This will be very inexpensive, and works very well for these woodblock print tracings.)
(I should also warn you that the semi-transparent paper sold in stationery stores as 'tracing paper' is not a good solution. Although it is of course easy to trace your design onto it, when it comes time to paste it down onto the woodblock, it will rapidly absorb the water in the glue and become wrinked and unusable.)
We have prepared a copy of the master tracing for this sample print (xxxKb), which you can download and print out onto suitable paper for use. The dimensions of the image area of the design are 16 x 19 cm (6 1/2" x 7 1/2") - not too big to make the carving and printing into a tiresome job, and not too small to require delicate 'finicky' work.
Now that the master tracing is all ready, we'll need to find a good piece of wood ...
|
|
|
|
