The Printer's Workspace
So here it is - the scene of the crime!

This is pretty much the standard Japanese way of setting up all the printing equipment. Everything is within easy reach, and the work goes on for hour after hour, with nothing moving but the two arms - reaching out to pick up each tool in turn ...
The moistened paper is under that newsprint in front of me, placed face down with the 'kento' corner at the front right - ready to be slipped out directly into place on the block. My particular way of doing things is to have the paper in groups of five sheets, each group separated by a dampened '8-page' section of newsprint. I print five sheets, and then flip the newspaper over on top of the finished sheets, brushing it with more water if needed.
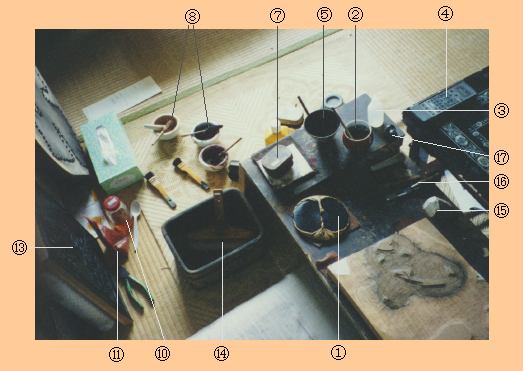
Here are a couple of close-ups of the tool selection ...

- (1) the baren, on its oily cloth pad. (I got up to take the picture, so as usual, the moment I stop work, over it goes on its back!)
- (2) cup of paste, with applicator stick
- (3) small plastic bottle of camellia oil
- (4) remote control for my cable radio system (a most important tool!)
- (5) pigment in bowl, with 'tokibo' applicator
- (6) bottle of pre-mixed 'bokuju' (sumi)
- (7) brush, standing on tile
- (8) ground pigments in bowls (I've just finished doing a 'test' printing, so all the colours are scattered around. In a minute, I'll put all but the 'active' colour out of the way up on a shelf)
- (9) sharkskin
- (10) bottle of liquid 'nikawa'
- (11) packet of dry pigment
- (12) another baren (I'll use two for this print, a delicate one for the key block and small areas of colour, and a tougher one for the wider colour blocks)
- (13) the key block for this print (It's smeared with sumi, so difficult to see in a photograph)
- (14) water bucket with 'mizubake' brush in the water
Here's another view ...
- (15) 'nagura' stone, for killing wood grain.
- (16) a couple of chisels - the 'kento-nomi' for cutting the registration marks, and a 'marunomi' for scooping out any areas that weren't carved quite deeply enough.
- (17) loupe
Notice the small angled 'stand' that sits at the left end of the printing bench (it's clearest in the first photo ...). Normal Japanese printers don't have such a device, but keep a miniature chest of drawers on the floor beside their bench, which is somewhat shorter than mine. The pigment, paste, etc. sits on top of this chest. They think I'm silly to do it this way, as the rubbing of the baren on the block tends to shake the whole bench, and the pigment bowl rattles around a bit ...
What is not clear from the photographs is the orientation of the bench and the window. I am not facing the window directly, but am turned at a 90 degree angle to it (the window is off to my left). I can thus see the 'glisten' of the pigment on the block while brushing, but the glare is not so bright as to cause difficulty, as it sometimes is if I face the window directly. It is also much easier to check the colour on each finished sheet - I lift it off the block, flip it over onto the pile, and then look at it with the light coming from behind me. Problems in the impression are immediately apparent. If I were facing the window, the light falling horizontally across the print would make it look too beautiful (!), and it would be very difficult to spot weak or badly printed colour. Printing that way can be very gratifying - until the time arrives to check the finished prints ...
(Please also remember that as I am left-handed, most other printers have everything arranged in a mirrored layout ...)
